

Logic Apps Designer Condition Check If String Contains Multiple Items
Power Fx (gotta use the cool keyword!) JSON function in Power Apps is pure magic, it's like a compactor converting anything you throw into it into a neat text representation to send over the wire, engrave on a golden bullion, or stash it as an alphabet soup. It works great apart from the times when it does not.
Turns out, it's got a 0.5MB size limit. Give it anything that produces longer string than that and get blank in return. No error, no messages, no trace. Nothing. Blank. Blankinness. Nothingness. Ouch.
Now you know.
Cover photo by Sarah Kilian on Unsplash
As Power Platform extends its reach beyond the realms of Dynamics 365 (CRM/CE/etc) and SharePoint, we're starting to see some interesting integration challenges from Dataverse big brother – Finance and Operations. Today's tip is from Parth Bhaidani. (Hey, you can have your name published here too – just drop your sizzling tip into jar@crmtipoftheday.com!)
Dual-write provides tightly coupled, bidirectional integration between Finance and Operations apps and Dataverse. However, at times it could be trickier to address the issues. Recently, I was working on a Dual-Write integration and one of the tasks was to add a new Table map. Prima facie the task was fairly straightforward until I stumbled upon the error, "The remote server returned an error: (404) Not Found. Unable to retrieve metadata for AX environment". Turns out the name of the Table on the F&O side has a forward slash (/) in it (Country/regions) and that's the reason for the error above.
To fix this issue, we would have to create a new Data Entity but without special characters. (Luckily, in F&O we can create multiple entities for the same underlying table – t.j.)
- In the F&O environment go to Data Management Workspace -> Data Entities
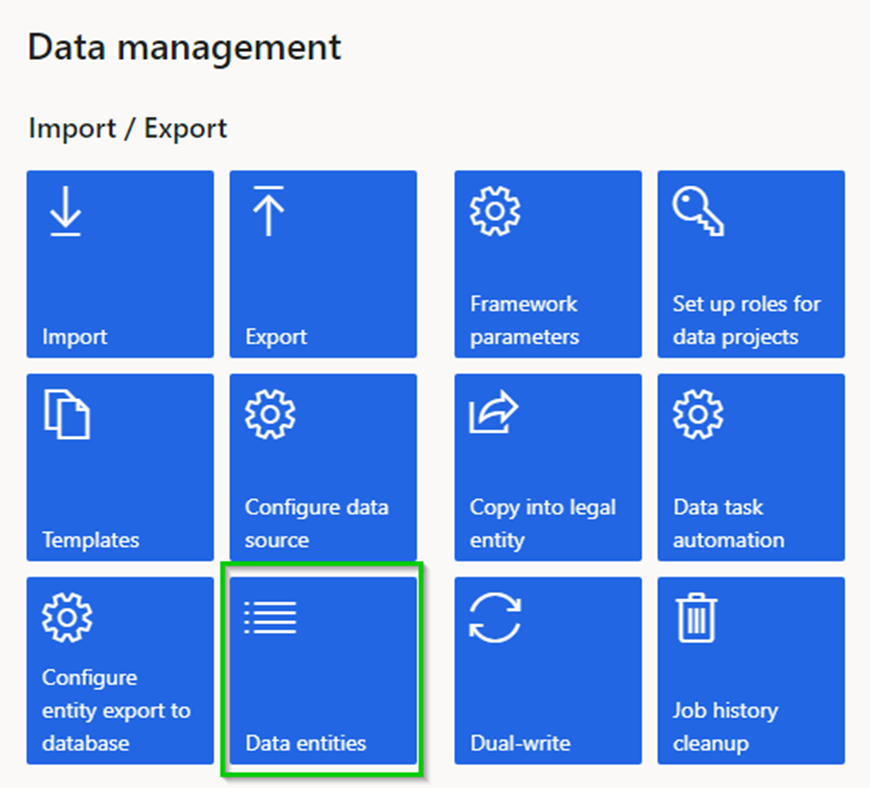
- Search the Table name for which you are trying to add the Table Mapping (in my case Country/regions) and copy the Target entity name.
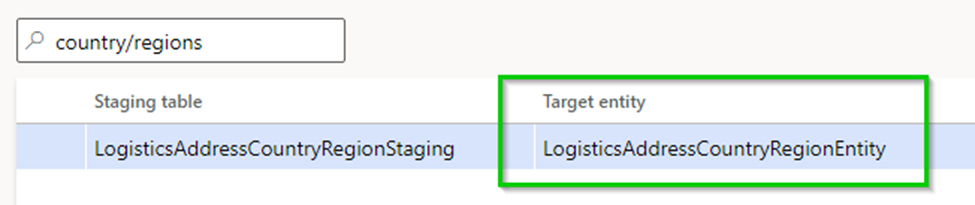
- Click New and populate Target entity with the copied Target entity from the above step, everything else will be auto populated and leave those columns as is. Click Save.

- Add the Table Mapping using the new name (which is again the one copied in Step 2). Now, you should be able to add mapping without any issues.
Cover photo by Vincent van Zalinge on Unsplash
Welcome to inaugural video shorts where all human knowledge is compressed into the bites of 60 seconds or less, to be consumed while waiting for the paint to dry.
In this episode we help Lisa to enable in-app notifications in model-driven Power Apps without any code using a freshly baked XrmToolBox tool by Ivan Fricko.
Links galore:
- In-App Notification Builder for XrmToolBox
- User experience Microsoft Docs
- Developer experience Microsoft Docs
- Last but not least: create notifications using Power Automate from ever awesome Sara Lagerquist
Cover photo by Prateek Katyal on Unsplash
You've seen us in Tip #1415 doing some Microsoft Graph abracadabra to call Excel functions directly from Power Automate. To do that we use Excel spreadsheet located on OneDrive for Business. Documentation mentions in passing that "You can use Microsoft Graph to allow web and mobile applications to read and modify Excel workbooks stored in OneDrive for Business, SharePoint site or Group drive" but none of the examples uses SharePoint, everyone is obsessed with /me/drive/. Brian asks a fair question:
Is it possible to do with an excel document stored in a SharePoint document library?
Brian
Lo and behold. The syntax is similar except instead of /me/ you have to point to the site, i.e. /sites/root/lists/{list-id}/ (if your list is on the root site). For example this will calculate the average:
POST https://graph.microsoft.com/v1.0/sites/root/lists/33246232-feed-dead-beef-decaf5388770/drive/root:/your-workbook.xlsx:/workbook/functions/average content-type: Application/Json authorization: Bearer {access-token} { "values": [1,2,3,4,5] } Cover photo bysalvatore ventura fromPexels
tl;dr
No, Power Platform team didn't sneak in any profanities into PowerShell module. It's caused by the verb Apply, is by design, and can be safely ignored.
Longer version
I usually oblivious to any warnings produced by the command line tools. My attention is fully reserved for the word FATAL in Ferrari red (#ff2800 if you must know), the rest I make go away with a magic cls command.
Benedikt Bergmann is by far a more diligent developer and, while using the Power Platform Build Tools, got concerned that some steps get a warning:
##[warning]The names of some imported commands from the module 'Microsoft.Xrm.WebApi.PowerShell' include unapproved verbs that might make them less discoverable. To find the commands with unapproved verbs, run the Import-Module command again with the Verbose parameter. For a list of approved verbs, type Get-Verb.
Is the sky falling and we're all doomed because PowerShell team from 1984 did not approve our choice of verbs? (Here's the full list: Approved Verbs for PowerShell Commands – PowerShell | Microsoft Docs)
Nah, turns out none of the approved verbs was a good fit for apply solution upgrade action that ended up being Apply-SolutionUpgrade in PowerShell. If you use this action in your script, you might get the warning and it's OK to ignore it.
Well, if you ask me I would have chosen something random and memorable, for example Mount-SolutionUpgrade, Measure-SolutionUpgrade, or even Resize-SolutionUpgrade. But now you know why I'm not in charge of naming PowerShell cmdlets.
Cover photo agracier – NO VIEWS, CC BY-SA 3.0, via Wikimedia Commons
If you know Excel you'll be very comfortable with Power Automate, they said. Except most of the Excel functions do not even have an equivalent in Power Automate.
But what if we could access all Excel functions in Power Automate? Say no mo
In the Episode 13 of Citizen Can Amey and George talk about broken giraffe, browsing Graph Explorer on Monday night, what is a holiday, and the magic of calling Excel functions from Power Automate.
watch the video
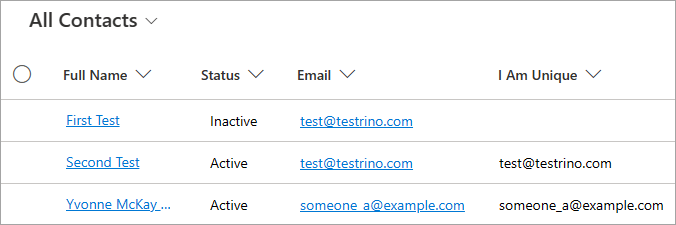
Alternate keys are great way to enforce uniqueness of the column values. For example, if you want lead emails to be truly unique, just add an alternate key and no user will be able to bypass that (unlike the duplicate detection which is a fairly timid mechanism). The challenge is when you want that uniqueness to apply only to active records. Bear with me.
You thought that lead was lost forever and deactivated the record (you do not ever delete important records, right?). Now they are coming back, rejuvenated and refreshed and ready to buy not one but seven of your wonderful Jigamagigs. New lead is created but with the same email and that's OK – we don't hold grudges. What you don't want is two active leads with the identical emails.
Alternate key using email are not going to work for you in this scenario, but you can enforce the uniqueness using a faux column that contains email for active records and null for inactive.
It works because alternate keys ignore null values.
The walkthrough below uses the contact table.
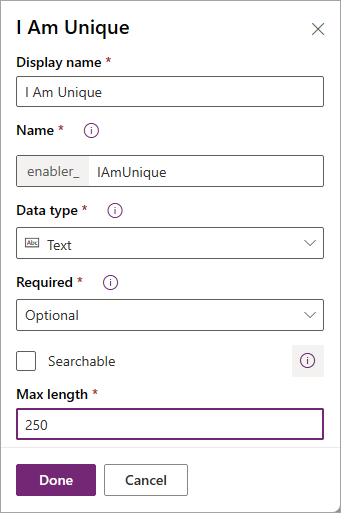
- Create a column large enough to hold email addresses. No need to make it searchable or enable audit.
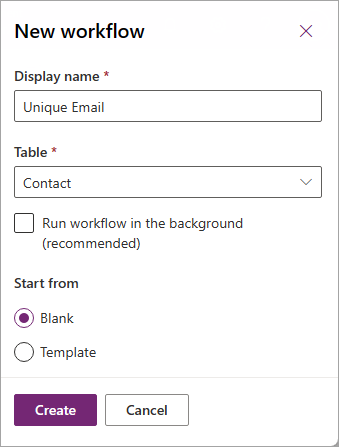
- Create new real-time workflow (and you can do that from the new solution explorer)
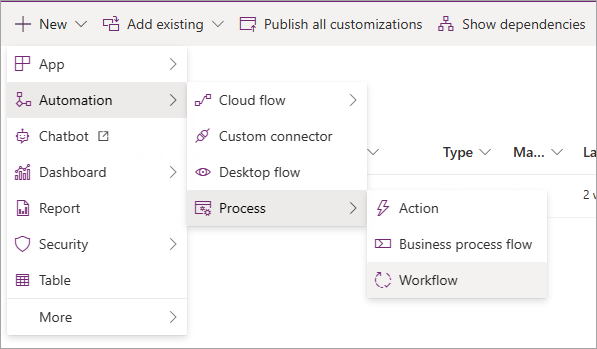 Automation > Process > Workflow">
- Set the workflow properties
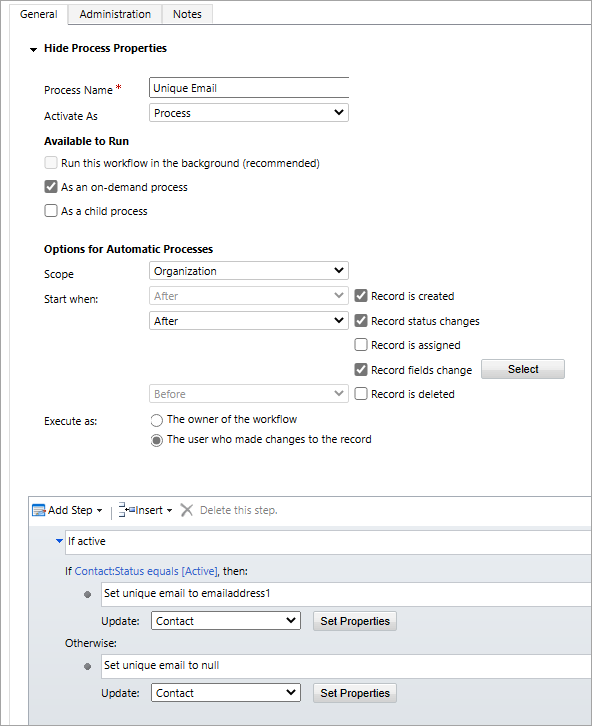
- Check As an on-demand process if you have existing records in your Dataverse instance so that you can run it once to populate the values.
- Start after Record is created, Record status changes, and Record fields change.
- Select emailaddress1 as the field to trigger.
- Set the workflow logic: If contact status is Active, set faux column created in Step 1 to emailaddress1 value. Otherwise clear the column.
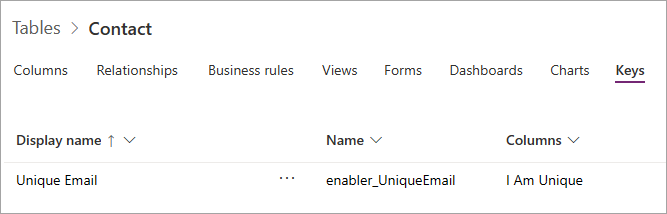
- Create alternate key over the faux column
- Run the workflow over all existing contact records to populate. Note: it may fail if your table contains active duplicates. Check for failed workflows, resolve the duplicates, run again.
Now, when a user tries to create a record with a duplicate email address they will see the error.
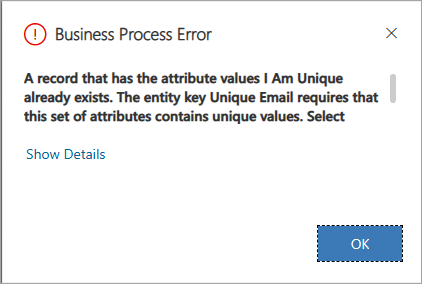
But users will be able to create the duplicates if only one of the records is active.
The good thing about this method is that it's bulletproof against clever users importing via Excel online, sneaky developers updating using SDK, and even almighty administrators activating the existing records that contain the duplicates.

This tip wouldn't be possible without my family, my parents, my sponsors, and David Yack who provided a sanity check where I needed it most.
Cover photo by Rupert Britton on Unsplash
Today's winner is Linn Zaw "I always" Win. And you can be one too if you email your tip to jar@crmtipoftheday.com!
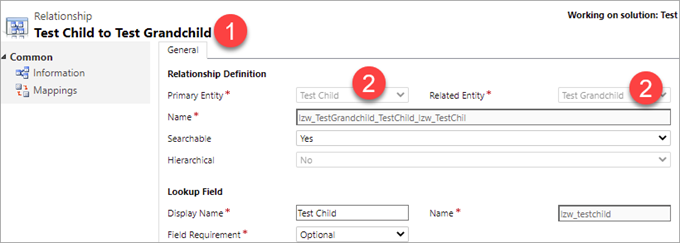
Have you ever added the 1:N or N:1 relationship into the solution, created new mappings in the solution and deployment the solution to another environment only to find out that the mappings are not deployed? Upon opening the customizations.xml of the solution, you might notice that the newly created mappings are not included under the <EntityMaps /> tag.
These are the components required in the solution to include the relationship mapping.
- Relationship which contains the mapping (obviously)
- Both Primary and Related tables of the relationship
- Target column of the mapping
Relationship
Mapping
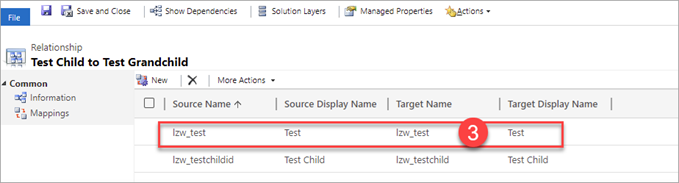
Tables and target column

Cover photo by Davies Designs Studio on Unsplash
It's spring time in Australia and our tipsters are coming back! Elaiza Benitez is here (at least that's what her Twitter handle says). And you can be here too – just email jar@crmtipoftheday.com with your brilliant suggestion and we'll take care of the rest.
For those who have been long time makers with Dynamics 365, you'll know that the WYSWYG editor buttons for email activities, email templates and knowledge base articles have always been positioned at the top.
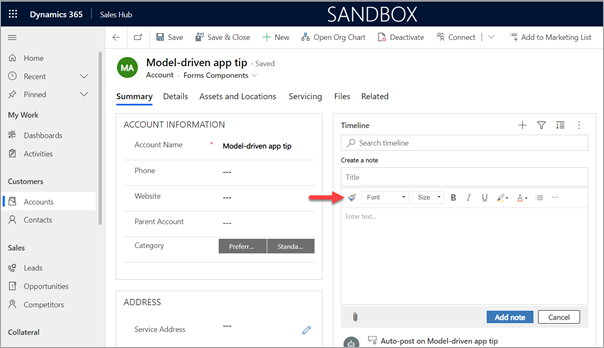
When the unified interface came along for model-driven apps improvements were made. The Notes in the timeline has a WYSWYG editor now and if you enable the Rich Text Editor custom control on a multi-line text field the WYSWYG editor appears at the bottom. This is inconsistent as based on what you record you are creating in the model-driven app, it will either show at the top or the bottom.
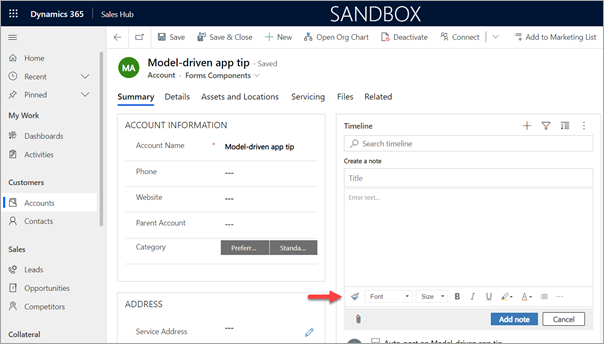
For consistency purposes you can change the positioning of the WYSWYG editor as it's controlled by a web resource. Simply create a new solution and add the RTEGlobalConfiguration.json web resource. As per the documentation, edit the web resource by updating the toolbarLocation property from bottom to top. Save and publish your changes.
Voila! The WYSWYG editor buttons will now display at the top for Notes.
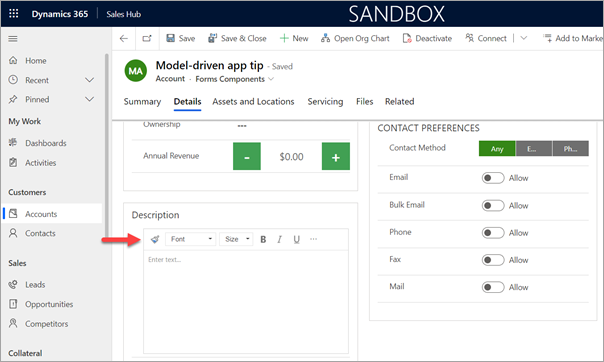
If you also have fields where the Rich Text Editor custom control is enabled, it will appear at the top as well.
Credit to our XrmToolbox creator, Tanguy Touzard, for this tip!
😳 WHAT? TANGUY? WAIT A MINUTE?! WHO'S THE TIPSTER HERE? Oh, well, I'll leave it here as a joint effort including of course myself. – t.j.
Cover photo by Christopher Machicoane-Hurtaud on Unsplash
I've created couple scripts that quickly check if your Power Apps portal has a potential vulnerability in the portals I look after.
OData Endpoint Probe
This one is quite trivial and simply probes the OData endpoints exposed by the portal. Takes portal url as a parameter and lists all OData endpoints. Endpoint is marked as a suspect if it can be accessed.

Dataverse Probe
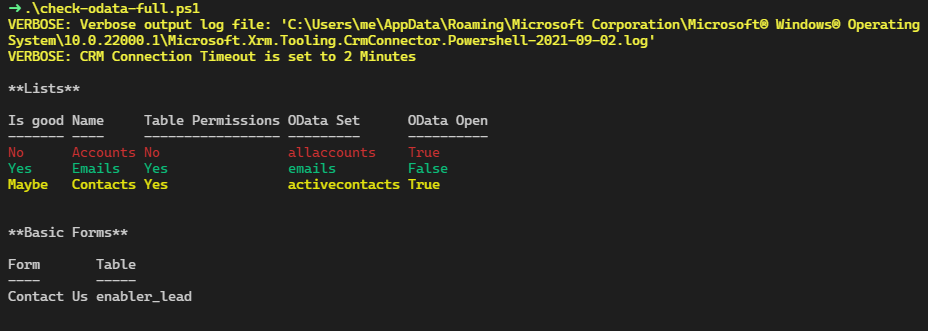
This one is a tad smarter and longer. It prompts to connect to Dataverse, grabs the first portal, and checks lists and forms to see if any of them have table permissions switched off. If permissions are on and endpoint is not accessible, we are good. If permissions are on and endpoint is open it's a potential leak. If permissions are off and there is an open OData endpoint, this is bad.
For forms it's black and white: script only lists the forms where table permissions are off.
Consider the chapter about Power Apps portals data leak closed.
Logic Apps Designer Condition Check If String Contains Multiple Items
Source: https://crmtipoftheday.com/
Posted by: reedthowite1944.blogspot.com
0 Response to "Logic Apps Designer Condition Check If String Contains Multiple Items"
Post a Comment